My little one saw someone rake leaves in the garden and wanted to do just that. I made her a rake with plastic bottle and gave her some paper leaves to work on...she absolutely loved it.
Think.Create.Craft
I love to create tiny pieces of craft, especially reusing anything and everything I find in the house. Now with the arrival of my daughter, in addition to crafts I experiment with little toys and activities for her.
Saturday, June 4, 2016
Saturday, May 28, 2016
From an L-Formal Shirt to an S- formal top
Would you believe if I told you this was an L-size formal shirt about an hour before this pic was taken. This is what I did to my hubby;s shirt that was rendered nearly out of use thanks to an ink stain,
I removed teh sleeves and marked the sleeves to be cut, based on my formal shirt of size S
I wanted to get rid of the part with the stain, so decided to cut about 4 inches as shown above
I joined the remaining bottom part of the shirt with the top, while adjusting the extra cloth as tiny gatherings...both in front and back. I did not remove the side stitches and this saved me a lot of stitching and finishing glitches.
I was very happy with the end result, would love to hear from you after you do your version :)
Friday, May 27, 2016
Paper placemat
These are extremely easy to make, easier than quilling I would say.
Fold reused paper into tiny strips across the length and breadth as shown. Use the length-wise strip as an anchor and paste the breath-wise ones to it to for the frame of your placemat.
Weave through it the remaining strips. And seal only the ends with glue
Paint it to match your decor.
Saturday, May 21, 2016
Sunday, May 15, 2016
Saturday, May 7, 2016
Sunday, May 1, 2016
DIY Mini carom board
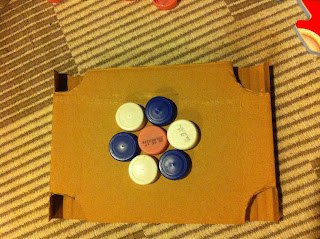
I made this mini carom board using Amazon Packaging material and a few bottle caps.
I marked the 4 corners to cut out for the coins to drop.
This is how the back side looks like you can tape it up to give the board a sturdy base.
This is now the board would finally look like, you can add the lines and center markings to make it look more real. Before I could take pictures of those, mine was out for use, and an overly excited toddler ended up tearing it up in the very first match :(
Subscribe to:
Comments (Atom)


